
About four months ago, I was looking on the internet and the Pinterest for ideas about making table to go behind my couch. One in particular caught my eye, unfortunately I don't have a source link for it currently. It however, had a butcher block top, a back splash and was just about what I was looking for.
In order to make a butcher block top, I would need help from my father as he has a ton more clamps to glue boards together than I currently have. I gave him a call, pitched my idea to him, and he had a different idea. Down in his workshop, for about thirty years, sat three table tops from Rax Restaurants. These table tops would be perfect for the project and he said he would get started on joining them together.
If you're not familiar with Rax Restaurants, you are either too young, or they were never in your area, as most of the stores closed in the 90's. It was a shame because they had the best salad bar for a fast food restaurant. Not to mention their chocolate chip shakes, the best in the business. There are still eight stores remaining, mainly in the Ohio area, but under different ownership. There may be a road trip in my future....
The real story about these three tables is, I met my wife at Rax Restaurant in the summer of 1988. We may have sat at these tables our break time. We are still together today and re-purposing tables from the place we met, that we will use in our daily lives so priceless.

My couch is nine feet long and can support a very large table behind it. The three tables joined together would be perfect for the project, which is going to top out at 7 feet, six inches long. Height wise, I wanted it to be taller than my couch to give it the tiered look. The range for taller bar stool chairs gave it a range of 41" to 43" tall. These were the only dimensions or plans that I gave my father for the project, the rest of the plans would be from the supplied photo. So he would have to wing it during the build process.
I did get a call from my dad, he asked me what depth I wanted the table to be. I honestly hadn't thought of that and was unsure. So I thought about it for a bit, sat down at a table and figured if my arm was sitting on a table, I would want it to be a bit longer than my arm. So I measured my arm at 20 inches, added a couple more onto that and said, two feet will be perfect. And you thought it was scientific.
So he cut the tables down, sent me this photo and it was a bit confusing as he was going to add some scrap Oak boards in between the boards. The remainder of the table would be used for the back splash.

Then he sent me this photo and it made more sense on what the purpose of the scarp oak boards would be. It just gave it more surface are to attach the tables together. He did have do make dado cuts into the table ends, which would also be a challenge for my workshop.

With the size and weight of the tables pieces, he made this jig to make the dado cuts much easier to handle.

A close up shot of the finished joint.

Panning out, it's starting to come together nicely.

At this point, the table top is glued together, the back splash is attached, but more oak boards would be required to complete the table. My dad was chatting with his neighbor, told him about the project, and his neighbor donated some oak boards that were reclaimed from a barn. This would allow him to create the legs, wrap the table and add a skirt to the bottom. The legs were just a simple 3" x 3" design. I say simple, but they took some work to get them looking like a solid post, but they are actually hollow.

Now that the legs are designed, assembled, and where they will be placed under the table, it's time to add the skirt. You can see the drawn lines where the legs will sit once they are in place in the corner. The skirt is inset about three inches on the sides, which was more than plenty finger room for when the table needs to be moved. Plus it allows for as many chairs as possible, which is three comfortably and four if they are jammed packed.

There is a local woodshop in the Burnsville area where you can go and rent tools by the hour. We used this place to run the table top through the planer. It was much easier than sanding off the old finish and there was a slight height difference between the table tops and the joining pieces. It worked out perfectly for the project.

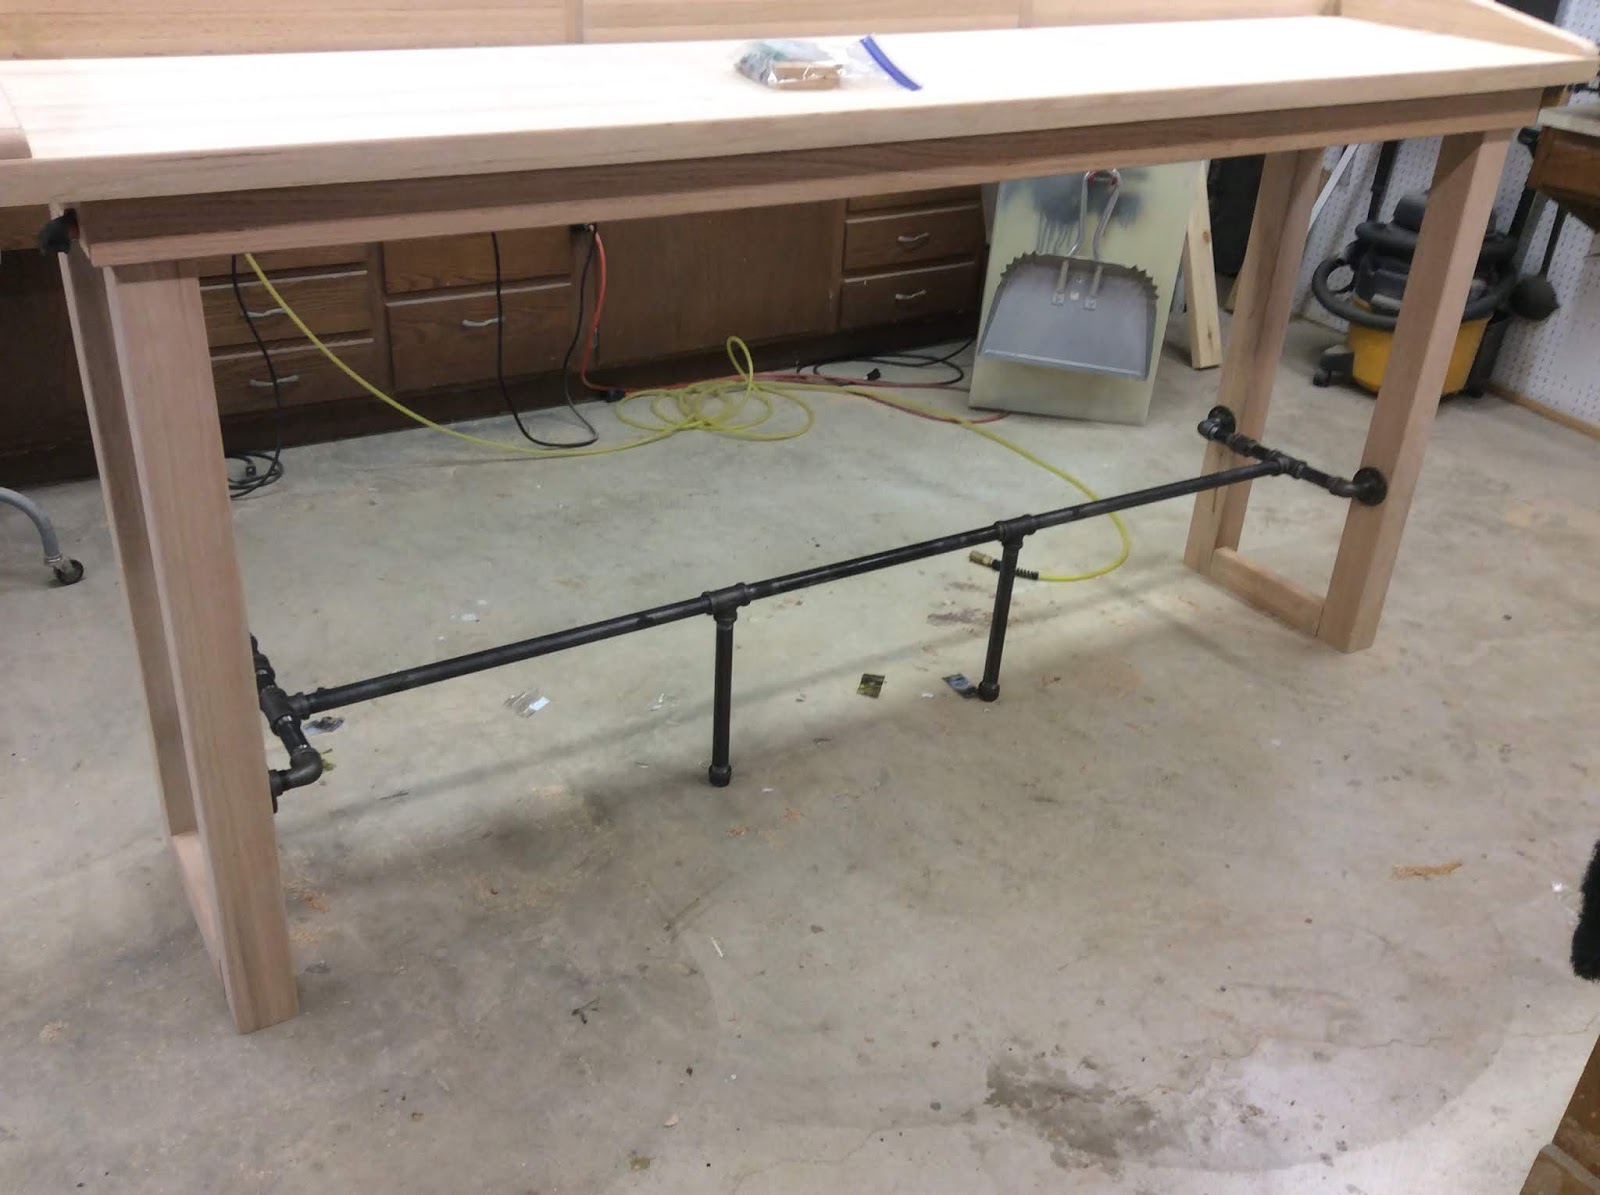
At this point, every part of the table is built and it's looking fantastic! We need to do a dry fit with the legs as we are adding a foot rail, since the chairs will be taller. This will also give some added stability for the legs as they will be seven feet apart.

We will use 1" cast iron pipe for the foot rail. It will sit 12" inches off of the ground.

This was the initial design for the foot rail. This will later change after staining and poly to just a rain on the back portion of the legs. The change allowed the chairs to sit under the table further when no one was sitting on them. And with that, there is nothing more to do to the table, but stain and poly.
Now for some truth, I've never stained a project this large before. So I was concerned about how to apply stain and remove the excess before it became too tacky to wipe off. I also was unsure what color to stain the table because I wanted it to look elegant. In my mind, I was picturing a cherry colored desk as something I've always thought was beautiful. I did samples of five or six stain colors before deciding. The biggest question would be, what would my wife like? After she made her decision, she liked the Black Cherry color of stain. Which was perfect as that was my number one stain color as well.
I have also never used Varathane's Premium Fast Dry stain up to this point. It is a little more expensive, dries in one hour and claims to only need one coat. After using this stain, I will always pay more for this stain for future projects, it's that good.

The evening I started staining, it was close to 90 degrees outside and the humidity was very uncomfortable. I had concerns about staining in this weather, but went ahead with starting up on the legs. The heat and humidity was very taxing and made the stain very tacky faster than I wanted, plus I kept dripping sweat onto the stain. So I opted to finish staining the legs and call it a night.

A couple of days later, the heat reduced, the humidity broke, thus making pleasant weather for being outside. Started back up again on the underside of the table. I'm only staining the outside portion of the table as we left the original stain on the underside of the table.

After letting the stain dry another evening, I flipped over the table and prepare for the most visible portion of the table. I worked as fast as I could, giving it one good coat of stain, as that is what the product says to do. I couldn't have been happier with the end result. It's dark with a bit of redness to it, which you probably cannot see in the photo.

So happy with the color and the product. Now that the stain is dried, adding the table legs to the table top is next on the list. I've added a dark brown chair into the photo. It might help you see the cherry color in the stain.

Since the premium stain worked so well, I wanted to use Varathane's Premium Triple Think Polyurethane. I went with a semi-gloss. I did break out my 3M mask, the same type of mask that was worn by Walter White in the AMC series, Breaking Bad. I needed for a Halloween costume a few year back.

This too worked better than I was expecting. It sprayed on very thick and one coat was all I really needed. Though I do wish I would have done a second coat on the table top surface, since that may get scratched over time since the top is used more than the rest of the table. I'm pretty sure the stain is still wet in this photo.


Table is built, stain is on and the poly has now dried. All that is left is to move it into my Family Room.

It's a beautiful piece for our family room that will get passed on to generations. My father does amazing work and all of the compliments and questions about the table are numerous since we've moved it into our home.
Thank you dad!
The day arrived when the carpet installers called me and said they were forty minutes away from my home.
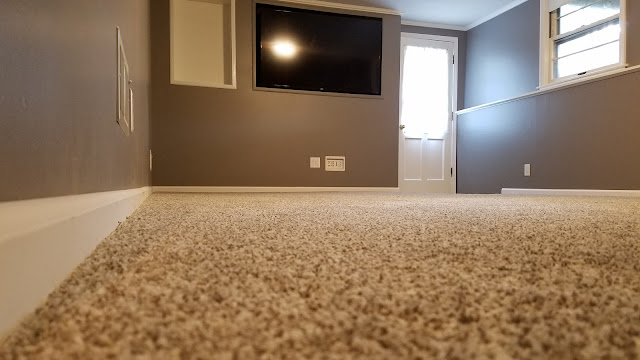
For as long as I've lived in my home, nineteen years now, I've never had carpet in this room that had a padding under it. I've mentioned the flat, ugly, no texture, ugly, grey carpet that was there when I moved into my home. The last of it is finally in a landfill.
Everything I've done to our Theater Room / Family Room to this point has improved the room and made it more livable. Adding the carpet, changed the dynamics of the room and completed the overall look of our new space. It went from a great looking room, to an amazing living space.
I've walked around on the new carpet for a couple of weeks since I took these initial photos. My feet are happy, they are warm, they are happy. It summer now, so the coldness that is normally there in the summer is gone. I'm looking forward to this winter, January, February, after the ground freezes, to feel how less cold it will feel on my feet and in this room.
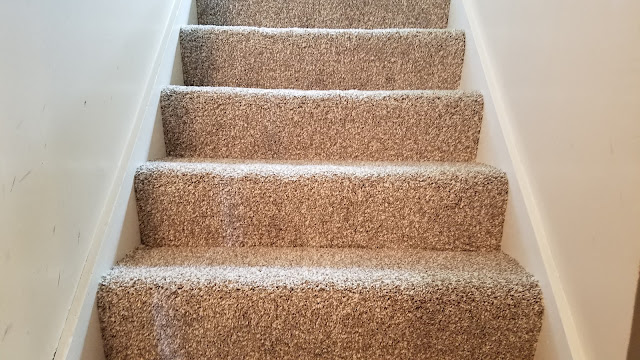
Our stairwell with the painted white trim and new carpet. As soon as I paint this area, that includes our entry way, this will look so much better.
Our hallway with many doors, five of them, that will be replaced over time.

A full view of the completed Phase Two. I was jamming out to Nirvana, Live At The Paramount at the time.

We are still not done with the room, but I would say Phase Two is now completed.
Is there a Phase Three you ask? Why yes, yes there is! Phase Three is adding all of the extras to the room. Like the in wall speakers, ceiling speakers, receiver purchase, build a dry bar, a seating area behind the couch, replacing the couch with an L shaped sectional, new entry way tile, and build an entertainment stand to house the cable box, receiver, game centers, etc, and add something decorative to the walls.
For as long as I've lived in my home, nineteen years now, I've never had carpet in this room that had a padding under it. I've mentioned the flat, ugly, no texture, ugly, grey carpet that was there when I moved into my home. The last of it is finally in a landfill.
Everything I've done to our Theater Room / Family Room to this point has improved the room and made it more livable. Adding the carpet, changed the dynamics of the room and completed the overall look of our new space. It went from a great looking room, to an amazing living space.
I've walked around on the new carpet for a couple of weeks since I took these initial photos. My feet are happy, they are warm, they are happy. It summer now, so the coldness that is normally there in the summer is gone. I'm looking forward to this winter, January, February, after the ground freezes, to feel how less cold it will feel on my feet and in this room.

Our stairwell with the painted white trim and new carpet. As soon as I paint this area, that includes our entry way, this will look so much better.

Our hallway with many doors, five of them, that will be replaced over time.

A full view of the completed Phase Two. I was jamming out to Nirvana, Live At The Paramount at the time.

We are still not done with the room, but I would say Phase Two is now completed.
Is there a Phase Three you ask? Why yes, yes there is! Phase Three is adding all of the extras to the room. Like the in wall speakers, ceiling speakers, receiver purchase, build a dry bar, a seating area behind the couch, replacing the couch with an L shaped sectional, new entry way tile, and build an entertainment stand to house the cable box, receiver, game centers, etc, and add something decorative to the walls.
With my son's Graduation Open House less than two weeks away, things are a bit chaotic around here. I'm trying to finish this room, among completing other tasks around our home. I am surprised by how time consuming these last few details are taking in this room. Or maybe it's due to the open house date is approaching fast, graduation stress around the house, and everything else in between just compounds my anxiety level.
The plan was the replace the inside house door, but I've decided to just paint it white. I've also added in the baseboard because the carpet is going to be installed in a few days and they requested to install the baseboard before the carpet goes down. Easy and fast install for that.

I've removed the last of the ugly grey carpet from the stairwell and we are painting the woodwork that lines the stairs white to match.

I already like the look of this, but will need to put a darker color of paint on the walls. We've discussed staining the steps a dark wood color, but have decided since it's cold in the winters here in Minnesota, we are staying with carpet.

That two inch strip between the door and the wall, but under the ledge was the final piece of drywall that I needed to repair. I had skipped this portion because the trim work would cover the majority of what was visible. In the end, I decided to update it so it looks like it should. Everything is fresh and new at last. Oh, and the door is in process of being painted white!

Oddly enough, I've had no trim around this door for so long, I cant recall how this looked when I removed it. They must have notched the door trim and left the shelf intact. The wood for the shelf is original, and I'm going to notch that instead of the door trim.

It's coming along well. The trim is in place, the door has it's final coat of paint. There wont be enough time to replace the tile in the entryway before the open house, so that will be skipped for now. It least there is a bit of the original tile left in place.

I also had a few areas where I did not paint enough grey on the walls, so I had to do some touch up painting. See? A lot of details to finish.

Well, the room is ready for carpet, however, I just received a call from the installers. There will not be carpet installation today. This is being rescheduled for next week as they had a delay in getting our carpet to their shop and cut to size. Ahhhh. At least my cat Lily is loving the emptiness of the room and the new surface to lay on.

I do believe I've completed the biggest portions in my Family Room Remodel project. I have carpet installing in about a week, but I have a local store doing that for me. Now it's all about finishing the details, but as I make the list of small details to finish up, the list is incredibly long.
Fill nail holes, paint the trim, add baseboard, finish window trim, finish the entryway, finish the sub-floor in the hallway, tear the carpet off the stairs, paint, paint, paint and more paint! The list is only a partial list.
My home has a partial basement, so we have the ledge around the foundation to deal with in every room. On the TV wall, I've eliminated this but the rest of my basement will have this ledge. I had removed the board on the half wall about 15 years ago when I originally attempted to remodel this room. I disliked most everything I did to the room at the time, so I stopped working on it.
Originally the room was white walls with brown accent color. It was an odd combo, but adding paint and removing some of the brown at the time just made it worse. To finally get rid of all of the brown this year puts a smile on my face. Now that I think about it more, the white walls were actually paneling nailed over drywall. Where there paneling edges came together, there was a brown piece of wood cover them. I'm unsure if I even have any photos of the original room.
I started by sanding the ledge. I totally loved the look of it in the photo, however we are painting it white. You can see the original brown color on the window sill ledge. There is also a splash of green on the end of that ledge from my original attempt at remodeling.

The blue tape goes on and the painting begins! And yes, I will remove the hardware before I start the paint on the windows.

It will take four coats of paint to stop the brown color from bleeding through the white, but oh my this looks wonderful now. I need to add a blank wall cover to my list of things to purchase to cover that old cable inlet. We will never use that outlet again.

Project Links -
It's a new day. In Part One of my Crown Molding Blog Post, I installed my first two pieces in about three hours. I was fine with that since this was my first time installing crown molding. It gave me confidence and I was ready to tackle the rest of the room. Here is Part Two and the conclusion of this part of the project.
My next two pieces to install will connect the first of two outside corners in this room. A nine foot section above the HDTV and a twelve inch section to complete the entryway. This also is my first outside corner. This was different because the crown molding will extend beyond the corner and makes the piece I cut just a couple inches longer than what I measure for the wall length. Cut it too short, and it wont meet up with the other side of the corner. My gut said to cut it just a tad longer than what I measure, then trim it down to here it needs to be so it matches up nicely with the other side. That was the right idea and this corner turned out great since it was exactly 90 degrees.
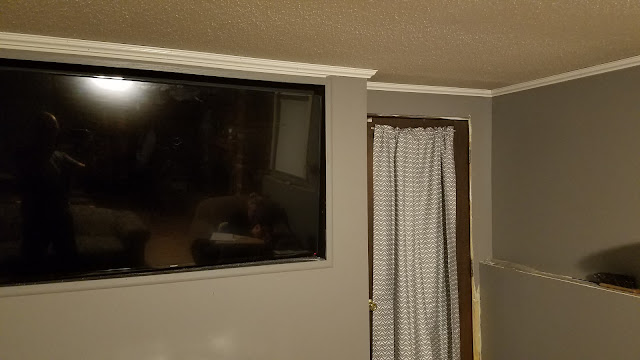
Over on the other corner of the nine foot section, I have my left speaker wire coming out of the wall. This too will be hidden with the crown molding. Oh yeah, to install the last two pieces took about an hour and a half. So I improved my time from yesterday!

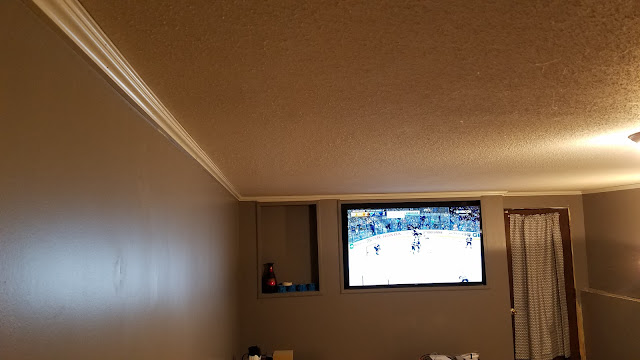
My longest wall in the room, about 18 feet in length. It felt like I did half the room, even though this was only two more pieces of Crown Molding. That is round two of the Stanley Cup playoffs between Nashville and St Louis that I was watching.
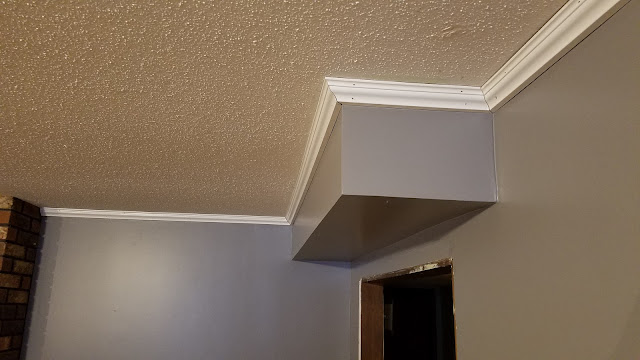
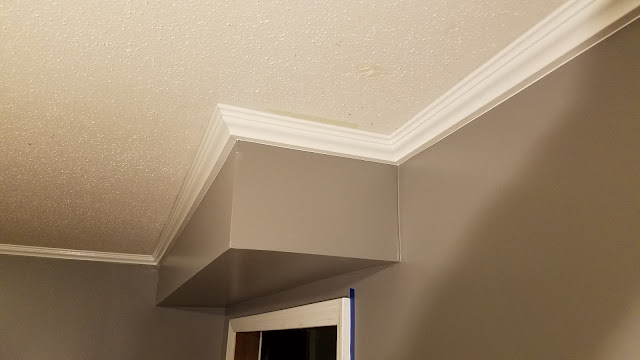
The last portion of the crown molding has two inside corners and one outside corner. The last piece, as you can see ends with the other side of my fireplace. My fireplace covers two walls, no seriously, two walls. These three corners were a bit challenging. The two inside corners were 92 degrees, the outside corner was 86 degrees. So I found a chart that gave me slightly different bevel and miter cuts to account for the non-square corners. They turned out fairly well. You can clearly see the gaps in the corners, but they are minimal.
After adding the painters caulk to the nail holes and corners, it looks flawless! I also painted over the caulk so in case it discolors in ten years, the holes wont reappear.
This is just a closer look at the finished caulk job. Next up is painting window trim, adding baseboard and finally getting carpet installed.

My next two pieces to install will connect the first of two outside corners in this room. A nine foot section above the HDTV and a twelve inch section to complete the entryway. This also is my first outside corner. This was different because the crown molding will extend beyond the corner and makes the piece I cut just a couple inches longer than what I measure for the wall length. Cut it too short, and it wont meet up with the other side of the corner. My gut said to cut it just a tad longer than what I measure, then trim it down to here it needs to be so it matches up nicely with the other side. That was the right idea and this corner turned out great since it was exactly 90 degrees.

Over on the other corner of the nine foot section, I have my left speaker wire coming out of the wall. This too will be hidden with the crown molding. Oh yeah, to install the last two pieces took about an hour and a half. So I improved my time from yesterday!

My longest wall in the room, about 18 feet in length. It felt like I did half the room, even though this was only two more pieces of Crown Molding. That is round two of the Stanley Cup playoffs between Nashville and St Louis that I was watching.

The last portion of the crown molding has two inside corners and one outside corner. The last piece, as you can see ends with the other side of my fireplace. My fireplace covers two walls, no seriously, two walls. These three corners were a bit challenging. The two inside corners were 92 degrees, the outside corner was 86 degrees. So I found a chart that gave me slightly different bevel and miter cuts to account for the non-square corners. They turned out fairly well. You can clearly see the gaps in the corners, but they are minimal.

After adding the painters caulk to the nail holes and corners, it looks flawless! I also painted over the caulk so in case it discolors in ten years, the holes wont reappear.

This is just a closer look at the finished caulk job. Next up is painting window trim, adding baseboard and finally getting carpet installed.

I spoken with several people about installing crown molding and they've made me worried, very worried. One said they couldn't quite make the corners meet. Another said to just hire someone to do it. While another said, it's simple, you just have to cut it upside down and backwards. His words still confuse me. So, my first adventure in crown molding begins....
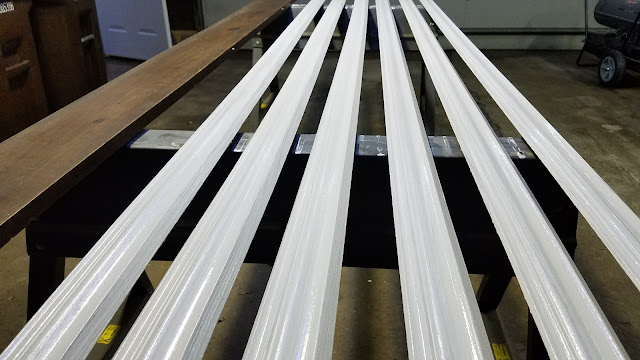
About eight years ago, my parents, for Christmas, purchased us 90 feet of crown molding. It was a great gift as we wanted to put crown molding in our family room. The problem was, I didn't have a miter saw, didn't have the time and I wanted to redo the room, but it just wasn't happening for a while. So it sat, and sat, and sat until now.
I measured the walls that I would be installing it on, determined I only needed 54 feet of it. So I painted six of the ten foot sections. This gives me very little room for error of painted, but I do have 30 feet of unpainted to work with.
I did do quite a bit of reading from bloggers of others who have successfully installed crown molding. I wanted to learn their tips, tricks and ideas. My wife's favorite tool is Pinterest, so I started there. This was quite handing in finding specific articles, even though Pinterest is basically just bookmarks that are shared. It works great and is a bit easier than searching via the internet for some things.
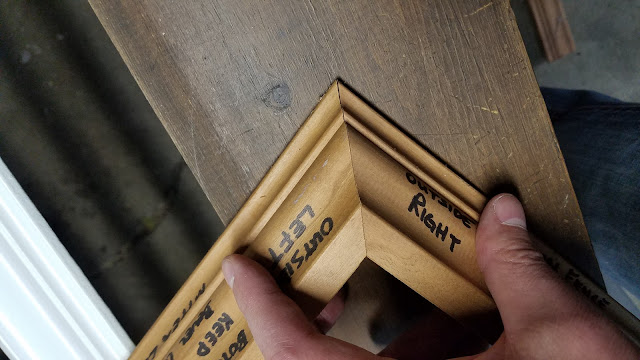
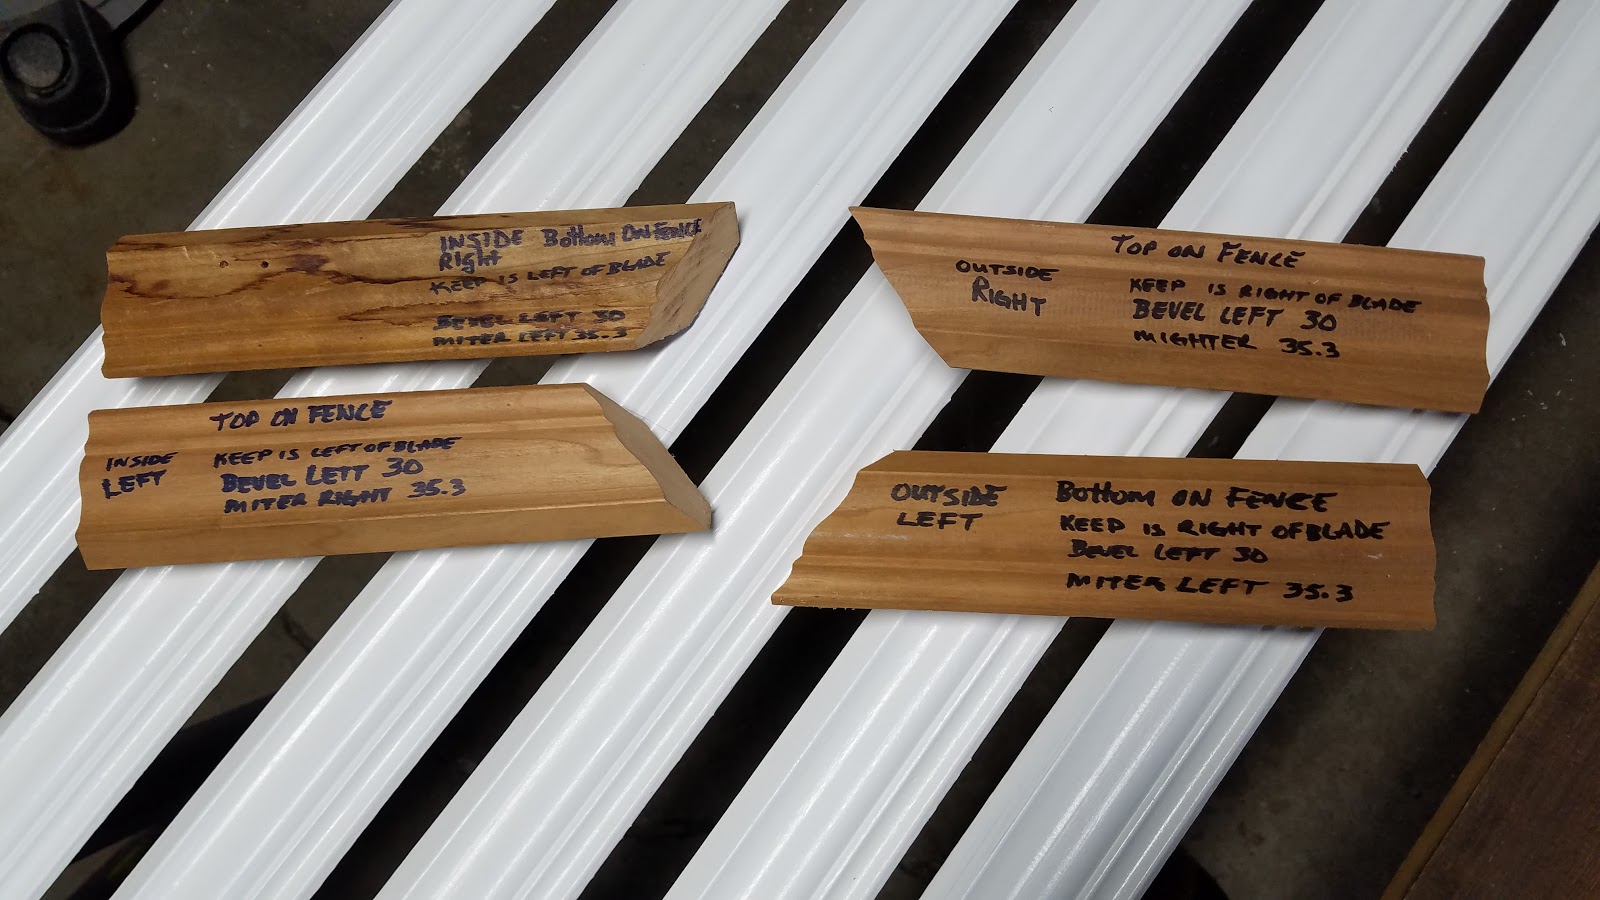
The best article I found was one titled: Templates Make Cutting Crown Molding A Breeze! - I can't tell you enough how easy these templates made it to visualize every cut I needed to make. I brought my 10" sample cuts into the room to make sure I had the correct cuts in mind, then followed the instructions I wrote on each one.
There are only four cuts you will make: Inside Right, Inside Left, Outside Right, Outside Left. If you read the article I reference in the above paragraph, you can read easier what is written on each template.

In this photo, I've brought my two outside cuts together for you to see how well they join together. The templates works perfectly as long as your angles are 90 degrees. If they are slightly off, you will need to adjust your angles a bit. There is Crown Molding Angle Chart to help with this! My crown molding sits on the wall at 45 degrees, so I use the 45/45 chart, then find the angle of my corner and adjust the miter and bevel accordingly. It gets you close enough.
The last article I read was for Making A Jig To Hold Your Crown Molding at the correct angle while you nail it in place. It was brilliant, except my crown molding was so easy to keep at a 45 degree angle.
I never used it for myself while installing. However, since I had ten foot sections and needed help holding the long pieces on the wall, my helper used it while standing flat footed on the floor. So in the end, it was a great tool to use.

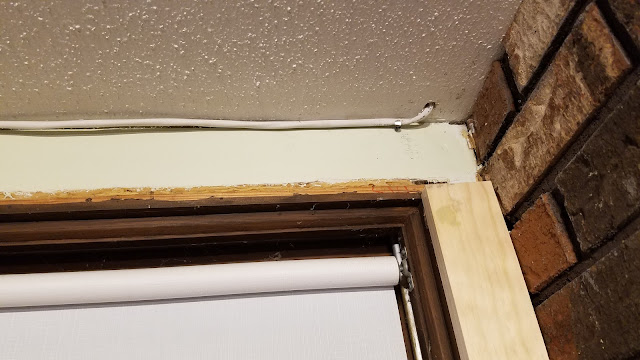
I am running speaker wire behind my crown molding, and this is where it enters my ceiling. I had to stop it short of the fireplace that is also in this room. The rear ceiling speakers will sit just behind the couch when they are installed.
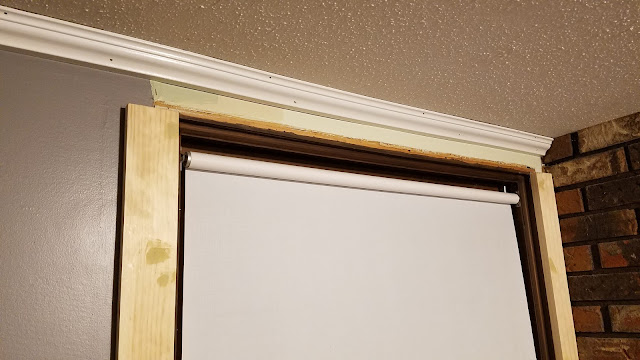
Starting in a lesser viewed corner was a good place to start, so I picked the doorway out of the house as we hardly use this entrance. There is a four foot section above the door and a longer wall of about eighteen feet. With my handy templates in hand, I would be making an Inside Left and an Inside Right corner cuts. The cuts were simple, the corners met up when I pieced them together, it was time to setup the finishing nailer. My first corner was acceptable. The nailer brought the wood deeper into the corner than I realized would happen and gave me a slight gap. Filler will hide and will be invisible at that point.

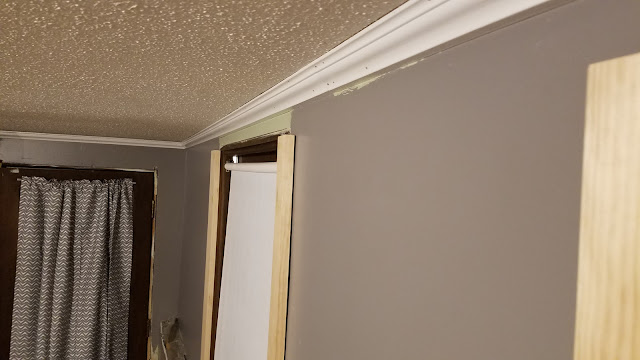
If you recall in the photo above, this is where the speaker wire enters into the ceiling. Nice, clean and now hidden from sight. I just hope I didn't put a nail through wire!
It was a great start, one that gave me optimism that I could actually finish this part of the project. I installed my first three pieces of crown molding tonight, one corner completed, seven corners to go. Total time to finish the short and long wall was three hours! I hoped it would get faster as I figured out the learning curve. That was however, all the time I had for this evening, as it was getting near 10:30 PM.
About eight years ago, my parents, for Christmas, purchased us 90 feet of crown molding. It was a great gift as we wanted to put crown molding in our family room. The problem was, I didn't have a miter saw, didn't have the time and I wanted to redo the room, but it just wasn't happening for a while. So it sat, and sat, and sat until now.
I measured the walls that I would be installing it on, determined I only needed 54 feet of it. So I painted six of the ten foot sections. This gives me very little room for error of painted, but I do have 30 feet of unpainted to work with.

The best article I found was one titled: Templates Make Cutting Crown Molding A Breeze! - I can't tell you enough how easy these templates made it to visualize every cut I needed to make. I brought my 10" sample cuts into the room to make sure I had the correct cuts in mind, then followed the instructions I wrote on each one.
There are only four cuts you will make: Inside Right, Inside Left, Outside Right, Outside Left. If you read the article I reference in the above paragraph, you can read easier what is written on each template.
In this photo, I've brought my two outside cuts together for you to see how well they join together. The templates works perfectly as long as your angles are 90 degrees. If they are slightly off, you will need to adjust your angles a bit. There is Crown Molding Angle Chart to help with this! My crown molding sits on the wall at 45 degrees, so I use the 45/45 chart, then find the angle of my corner and adjust the miter and bevel accordingly. It gets you close enough.

The last article I read was for Making A Jig To Hold Your Crown Molding at the correct angle while you nail it in place. It was brilliant, except my crown molding was so easy to keep at a 45 degree angle.

I never used it for myself while installing. However, since I had ten foot sections and needed help holding the long pieces on the wall, my helper used it while standing flat footed on the floor. So in the end, it was a great tool to use.

I am running speaker wire behind my crown molding, and this is where it enters my ceiling. I had to stop it short of the fireplace that is also in this room. The rear ceiling speakers will sit just behind the couch when they are installed.

Starting in a lesser viewed corner was a good place to start, so I picked the doorway out of the house as we hardly use this entrance. There is a four foot section above the door and a longer wall of about eighteen feet. With my handy templates in hand, I would be making an Inside Left and an Inside Right corner cuts. The cuts were simple, the corners met up when I pieced them together, it was time to setup the finishing nailer. My first corner was acceptable. The nailer brought the wood deeper into the corner than I realized would happen and gave me a slight gap. Filler will hide and will be invisible at that point.

If you recall in the photo above, this is where the speaker wire enters into the ceiling. Nice, clean and now hidden from sight. I just hope I didn't put a nail through wire!

It was a great start, one that gave me optimism that I could actually finish this part of the project. I installed my first three pieces of crown molding tonight, one corner completed, seven corners to go. Total time to finish the short and long wall was three hours! I hoped it would get faster as I figured out the learning curve. That was however, all the time I had for this evening, as it was getting near 10:30 PM.

