The best laid plans of mice and men often go awry....
Painted black, blue taped, in this simplistic layout, there lies a flaw. One large, obnoxious flaw. It's all there, black and white, right there for you to see. No wait, I have not revealed this yet, so not so obvious for you.
I purchased from Amazon, a very simple and inexpensive flat HDTV stand from Cheetah for about $24 dollars. It mounts flat to the wall, connect it to the recessed box, hang the TV and done. However, that works great for a wall that is flat, not recessed. You see, with a 65" HDTV to be mounted, that leaves one inch of space to get your hands around the back to connect all of the wires or do ANYTHING in the back of the TV. That's a big problem!
So, my inexpensive stand went to the wayside and will be used elsewhere. I had to research a new articulating HDTV wall mounting bracket. I deceided on the ECHOGEAR EGLF1-PK for about $80 bucks (as of this posting). If you are in need of a heavy duty stand, this one is just what you need for a reasonable price. My 65" Samsung weighs 72 pounds and the stand is rated for 132 pounds.

The new mounting bracket was a bit larger than the first bracket, and that created yet another problem. Where I needed to mount the bracket to the wall, it now partly covered the 3-Gang Box. I needed to lower the box to accommodate the larger base of the new stand. My first thought was to remove the entire wooded recessed box and replace the back panel.


I used my Kreg Jig to build the wooded recess box, so naturally I used this to reattached the removed piece of wood. I don't own a biscuit joiner, but that would have also got the job done.


First coat of gray is on the walls. This four foot doorway leads to the upstairs.

Panning out on the TV side of the room, in this photo, I have not moved the 3-Gang box. But that is all spelled out above.

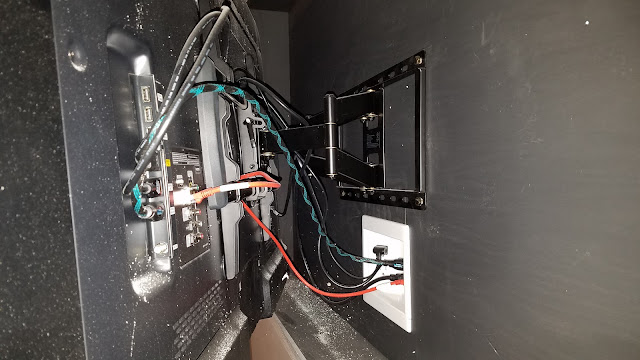
A closer look at the Echogear wall mounting bracket and how everything fits behind the TV now. Nevermind all of that ceiling debris, it's all cleaned up now.
And finally, the front of the TV, mounted in the recessed box with an inch of space to spare.

Painted black, blue taped, in this simplistic layout, there lies a flaw. One large, obnoxious flaw. It's all there, black and white, right there for you to see. No wait, I have not revealed this yet, so not so obvious for you.
I purchased from Amazon, a very simple and inexpensive flat HDTV stand from Cheetah for about $24 dollars. It mounts flat to the wall, connect it to the recessed box, hang the TV and done. However, that works great for a wall that is flat, not recessed. You see, with a 65" HDTV to be mounted, that leaves one inch of space to get your hands around the back to connect all of the wires or do ANYTHING in the back of the TV. That's a big problem!
So, my inexpensive stand went to the wayside and will be used elsewhere. I had to research a new articulating HDTV wall mounting bracket. I deceided on the ECHOGEAR EGLF1-PK for about $80 bucks (as of this posting). If you are in need of a heavy duty stand, this one is just what you need for a reasonable price. My 65" Samsung weighs 72 pounds and the stand is rated for 132 pounds.

The new mounting bracket was a bit larger than the first bracket, and that created yet another problem. Where I needed to mount the bracket to the wall, it now partly covered the 3-Gang Box. I needed to lower the box to accommodate the larger base of the new stand. My first thought was to remove the entire wooded recessed box and replace the back panel.

That was a ton of work and not a simple solution, even though it would be a cleaner look when finished. Instead, I decided to cut a chunk of wood out and move that piece up. This would give the exact same shape for the 3-Gang box. Yes, that is flat black paint and it marks up way too easy. In the future, I would use some type of matte finish if you paint your box.

I used my Kreg Jig to build the wooded recess box, so naturally I used this to reattached the removed piece of wood. I don't own a biscuit joiner, but that would have also got the job done.

I had to come up with some way to hold the filler piece in place while I screwed it in place. So this odd design, using brackets and scrap wood was an odd sight to see. However, there was just enough room to get the drill in place to tighten all of the screws.

Kreg also sells the wooded plugs to cover the holes. This was my first time using them and they worked wonderful. A little bit of wood filler, some sanding....

One final coat of my ugly black flat paint and it looks as good as new. If you enlarge the photo, I'm sure you can make out the trace of where the original location was, but once the TV is in place, I have no idea what mistake I made.

While I was monkeying around with moving the 3-Gang Box, I was painting the room to the gray color wifey and I had selected. Aside from the frame around the HDTV, we will paint all of the trim work white. Here is the last of the before photos, green walls, furniture in the middle of the room.

First coat of gray is on the walls. This four foot doorway leads to the upstairs.

Panning out on the TV side of the room, in this photo, I have not moved the 3-Gang box. But that is all spelled out above.

A closer look at the Echogear wall mounting bracket and how everything fits behind the TV now. Nevermind all of that ceiling debris, it's all cleaned up now.

And finally, the front of the TV, mounted in the recessed box with an inch of space to spare.


0 comments:
Post a Comment