
Showing posts with label Woodworking. Show all posts
Showing posts with label Woodworking. Show all posts

About four months ago, I was looking on the internet and the Pinterest for ideas about making table to go behind my couch. One in particular caught my eye, unfortunately I don't have a source link for it currently. It however, had a butcher block top, a back splash and was just about what I was looking for.
In order to make a butcher block top, I would need help from my father as he has a ton more clamps to glue boards together than I currently have. I gave him a call, pitched my idea to him, and he had a different idea. Down in his workshop, for about thirty years, sat three table tops from Rax Restaurants. These table tops would be perfect for the project and he said he would get started on joining them together.
If you're not familiar with Rax Restaurants, you are either too young, or they were never in your area, as most of the stores closed in the 90's. It was a shame because they had the best salad bar for a fast food restaurant. Not to mention their chocolate chip shakes, the best in the business. There are still eight stores remaining, mainly in the Ohio area, but under different ownership. There may be a road trip in my future....
The real story about these three tables is, I met my wife at Rax Restaurant in the summer of 1988. We may have sat at these tables our break time. We are still together today and re-purposing tables from the place we met, that we will use in our daily lives so priceless.

My couch is nine feet long and can support a very large table behind it. The three tables joined together would be perfect for the project, which is going to top out at 7 feet, six inches long. Height wise, I wanted it to be taller than my couch to give it the tiered look. The range for taller bar stool chairs gave it a range of 41" to 43" tall. These were the only dimensions or plans that I gave my father for the project, the rest of the plans would be from the supplied photo. So he would have to wing it during the build process.
I did get a call from my dad, he asked me what depth I wanted the table to be. I honestly hadn't thought of that and was unsure. So I thought about it for a bit, sat down at a table and figured if my arm was sitting on a table, I would want it to be a bit longer than my arm. So I measured my arm at 20 inches, added a couple more onto that and said, two feet will be perfect. And you thought it was scientific.
So he cut the tables down, sent me this photo and it was a bit confusing as he was going to add some scrap Oak boards in between the boards. The remainder of the table would be used for the back splash.

Then he sent me this photo and it made more sense on what the purpose of the scarp oak boards would be. It just gave it more surface are to attach the tables together. He did have do make dado cuts into the table ends, which would also be a challenge for my workshop.
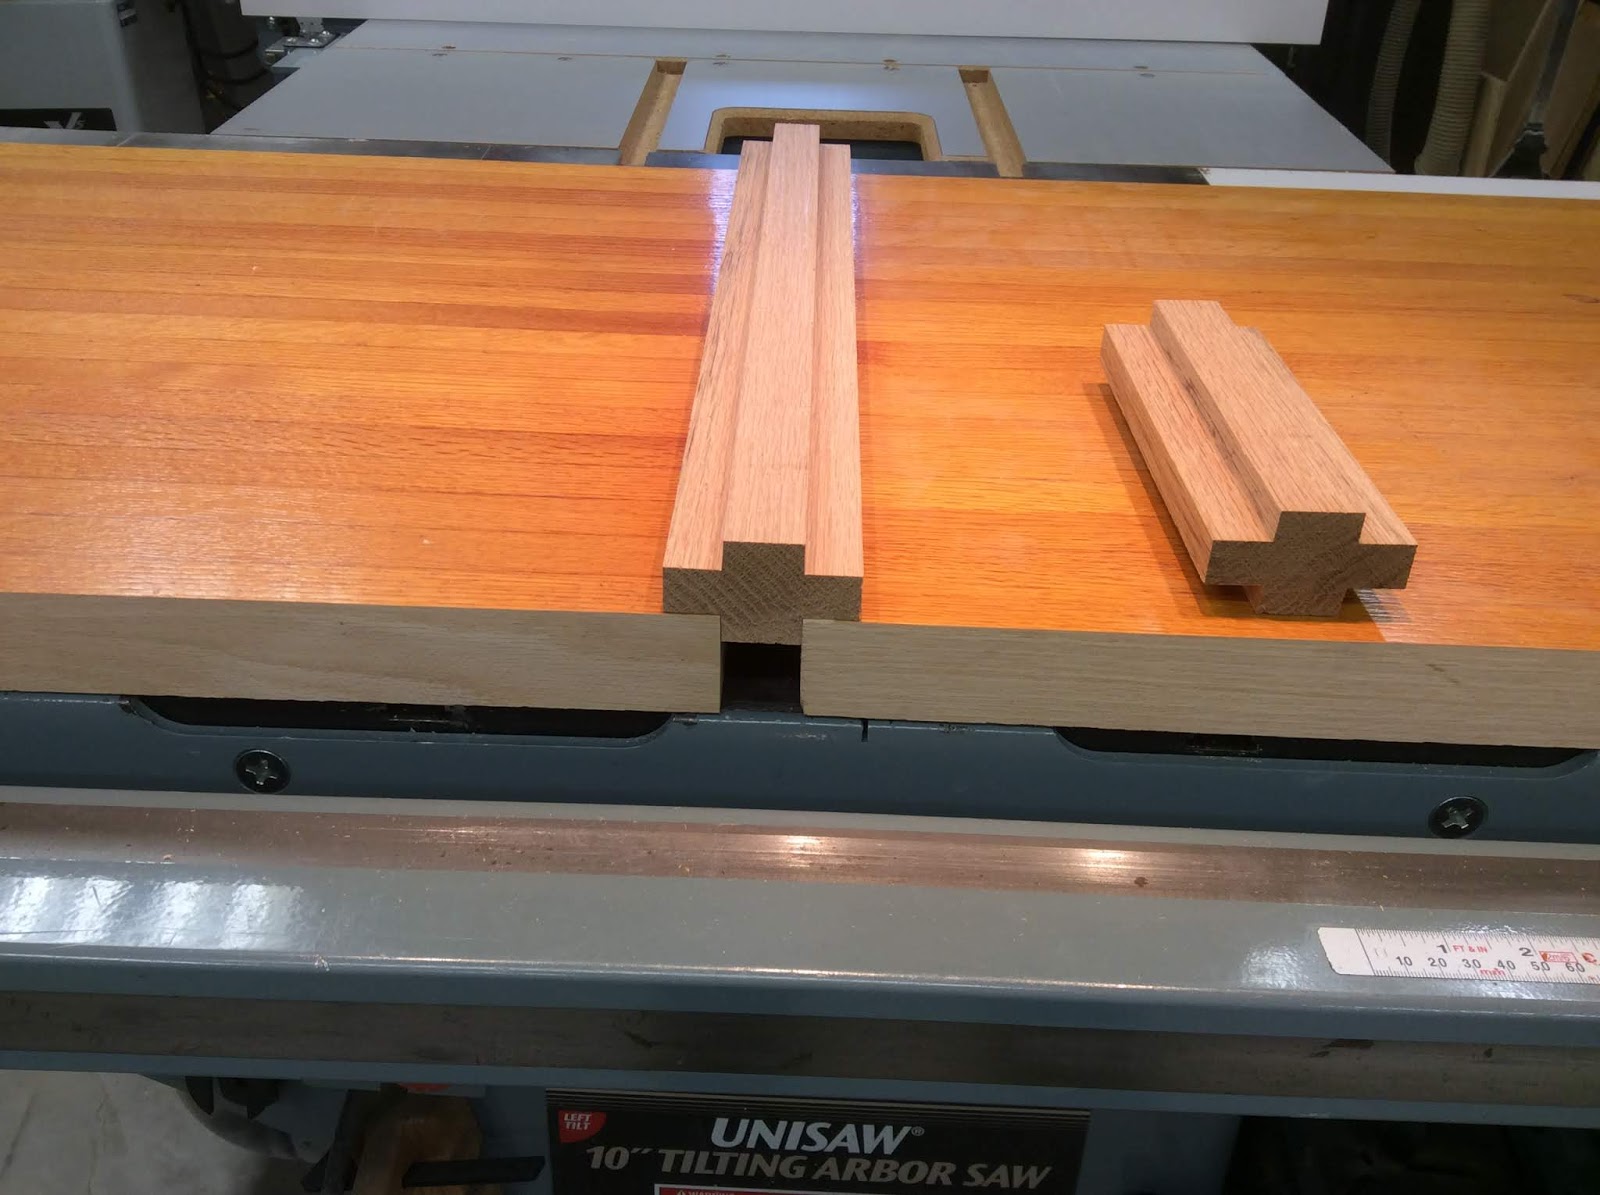
With the size and weight of the tables pieces, he made this jig to make the dado cuts much easier to handle.

A close up shot of the finished joint.

Panning out, it's starting to come together nicely.

At this point, the table top is glued together, the back splash is attached, but more oak boards would be required to complete the table. My dad was chatting with his neighbor, told him about the project, and his neighbor donated some oak boards that were reclaimed from a barn. This would allow him to create the legs, wrap the table and add a skirt to the bottom. The legs were just a simple 3" x 3" design. I say simple, but they took some work to get them looking like a solid post, but they are actually hollow.

Now that the legs are designed, assembled, and where they will be placed under the table, it's time to add the skirt. You can see the drawn lines where the legs will sit once they are in place in the corner. The skirt is inset about three inches on the sides, which was more than plenty finger room for when the table needs to be moved. Plus it allows for as many chairs as possible, which is three comfortably and four if they are jammed packed.

There is a local woodshop in the Burnsville area where you can go and rent tools by the hour. We used this place to run the table top through the planer. It was much easier than sanding off the old finish and there was a slight height difference between the table tops and the joining pieces. It worked out perfectly for the project.

At this point, every part of the table is built and it's looking fantastic! We need to do a dry fit with the legs as we are adding a foot rail, since the chairs will be taller. This will also give some added stability for the legs as they will be seven feet apart.

We will use 1" cast iron pipe for the foot rail. It will sit 12" inches off of the ground.

This was the initial design for the foot rail. This will later change after staining and poly to just a rain on the back portion of the legs. The change allowed the chairs to sit under the table further when no one was sitting on them. And with that, there is nothing more to do to the table, but stain and poly.

Now for some truth, I've never stained a project this large before. So I was concerned about how to apply stain and remove the excess before it became too tacky to wipe off. I also was unsure what color to stain the table because I wanted it to look elegant. In my mind, I was picturing a cherry colored desk as something I've always thought was beautiful. I did samples of five or six stain colors before deciding. The biggest question would be, what would my wife like? After she made her decision, she liked the Black Cherry color of stain. Which was perfect as that was my number one stain color as well.
I have also never used Varathane's Premium Fast Dry stain up to this point. It is a little more expensive, dries in one hour and claims to only need one coat. After using this stain, I will always pay more for this stain for future projects, it's that good.

The evening I started staining, it was close to 90 degrees outside and the humidity was very uncomfortable. I had concerns about staining in this weather, but went ahead with starting up on the legs. The heat and humidity was very taxing and made the stain very tacky faster than I wanted, plus I kept dripping sweat onto the stain. So I opted to finish staining the legs and call it a night.

A couple of days later, the heat reduced, the humidity broke, thus making pleasant weather for being outside. Started back up again on the underside of the table. I'm only staining the outside portion of the table as we left the original stain on the underside of the table.

After letting the stain dry another evening, I flipped over the table and prepare for the most visible portion of the table. I worked as fast as I could, giving it one good coat of stain, as that is what the product says to do. I couldn't have been happier with the end result. It's dark with a bit of redness to it, which you probably cannot see in the photo.

So happy with the color and the product. Now that the stain is dried, adding the table legs to the table top is next on the list. I've added a dark brown chair into the photo. It might help you see the cherry color in the stain.

Since the premium stain worked so well, I wanted to use Varathane's Premium Triple Think Polyurethane. I went with a semi-gloss. I did break out my 3M mask, the same type of mask that was worn by Walter White in the AMC series, Breaking Bad. I needed for a Halloween costume a few year back.

This too worked better than I was expecting. It sprayed on very thick and one coat was all I really needed. Though I do wish I would have done a second coat on the table top surface, since that may get scratched over time since the top is used more than the rest of the table. I'm pretty sure the stain is still wet in this photo.


Table is built, stain is on and the poly has now dried. All that is left is to move it into my Family Room.

It's a beautiful piece for our family room that will get passed on to generations. My father does amazing work and all of the compliments and questions about the table are numerous since we've moved it into our home.
Thank you dad!
Today I'm working on the outer shell of the Floating Corner Shelf project. I didn't get as far along as expected since I totally goofed up my first run of cuts through my Shop Smith. However, the second attempt was successful and I did a minor design change on how the outer shell will come together.
If you have not read part one, you can view that here.
My original design for the project was to stay true to the single wall floating shelf plans. The inner skeleton would attach to the wall. The outer shell, would be one piece that completely covers the inside. In Part 1, I referenced two different designs that I believed I could improve on. Both of these plans built the inner skeleton, attached them to the wall and then built the other shell piece by piece with the frame attached to the wall the entire time.
For my skeleton frame, I used 1x3 pine. The length and width are 46" x 28" with the depth around 9 1/2". The short boards are all cut at 8".

For the outer shell, I started with 1x4 pine select, cut the boards down to 3". 2.5" will cover the inner skeleton frame and a quarter inch for the top and bottom plywood boards.
I'm making rabbet cuts for the top and bottom plywood to sit in so it gives me one piece to slide over the frame. And this is where I did my goof up. My first run through I did my rabbet cuts on the flat side of the boards instead of the ends. I guess when you're engineering on the fly, there is bound to be an error or two.

For the design change I referenced above, I have decided instead of making the outer shell all one piece to slide over the skeleton, I'm splitting in up into two pieces. The reason behind this is my corner walls are not perfect 90 degrees. So I will need to trim some of the boards to account for this, so having two separate slide shelves will work out better in the long run.
The plywood on the long side will cover three of the squares and will go on first. The short side will also cover three squares, including the corner section and go on second. The long board I left an extra 1.5" but had to cut the extra wood off, as you can see in this photo, to allow the short side plywood to sit flat.

As we pan out, we are nearly set to attach the 1/4" plywood to the front pieces. I am going to use the end pieces as they are, so I'm concerned once I attach the plywood, it will be a bit flimsy. If that is the case, I'll attach a couple of short boards to the front pieces to give the plywood some support.

That is all for today. Part three will include attaching the plywood pieces. It may also include painting as that would be all that is left, aside from attaching the project to the walls.
If you have not read part one, you can view that here.
My original design for the project was to stay true to the single wall floating shelf plans. The inner skeleton would attach to the wall. The outer shell, would be one piece that completely covers the inside. In Part 1, I referenced two different designs that I believed I could improve on. Both of these plans built the inner skeleton, attached them to the wall and then built the other shell piece by piece with the frame attached to the wall the entire time.
For my skeleton frame, I used 1x3 pine. The length and width are 46" x 28" with the depth around 9 1/2". The short boards are all cut at 8".

For the outer shell, I started with 1x4 pine select, cut the boards down to 3". 2.5" will cover the inner skeleton frame and a quarter inch for the top and bottom plywood boards.
I'm making rabbet cuts for the top and bottom plywood to sit in so it gives me one piece to slide over the frame. And this is where I did my goof up. My first run through I did my rabbet cuts on the flat side of the boards instead of the ends. I guess when you're engineering on the fly, there is bound to be an error or two.

For the design change I referenced above, I have decided instead of making the outer shell all one piece to slide over the skeleton, I'm splitting in up into two pieces. The reason behind this is my corner walls are not perfect 90 degrees. So I will need to trim some of the boards to account for this, so having two separate slide shelves will work out better in the long run.
The plywood on the long side will cover three of the squares and will go on first. The short side will also cover three squares, including the corner section and go on second. The long board I left an extra 1.5" but had to cut the extra wood off, as you can see in this photo, to allow the short side plywood to sit flat.

As we pan out, we are nearly set to attach the 1/4" plywood to the front pieces. I am going to use the end pieces as they are, so I'm concerned once I attach the plywood, it will be a bit flimsy. If that is the case, I'll attach a couple of short boards to the front pieces to give the plywood some support.

That is all for today. Part three will include attaching the plywood pieces. It may also include painting as that would be all that is left, aside from attaching the project to the walls.
I had received a Pinterest message from my lovely wife about floating corner shelves for my daughters room. I was intrigued with the idea since I've seen plenty of floating shelf plans and ideas. Yet I hadn't seen plans for floating corner shelves.
So I researched the project for some ideas. Surprisingly, I only found a couple of websites that had corner floating shelves. In reality, it was two DIY blogs and both used 2x4's for the inside structure. So, I centered my original plans around 2x4's on paper.

In this crude drawing of plans, the only part that was set in stone was the outer dimensions. The 46" by 28" shelf length was here it stay. Everything else was a guess and up for debate once I started the project. After looking through my available pile of project wood and the logistics of it, I decided that the 2x4's was not going to happen. It seams a bit overkill, plus I felt I could do better than the two web plans I stumbled across.
Instead I opted for 1x3 pine for the skeleton of the project. I had most of it on hand and it made the shelves a bit more precision on my part. As I started cutting the wood and laying it out on my shop floor, I was happy with the decision to abandon the 2x4's.

I have the Kreg Pocket Hole jig that I love using for as many of my projects as I can. This project was another perfect use for it since all of the pocket holes will be concealed by the outer shell. Now I don't have the fancy, quick release Kreg jig. Instead, I've always used one of my Rockler wood clamps to get the job done.

I'm making two shelves total, with seven 7" boards per shelf. Six of the boards will have two holes each and the seventh board will have two on one end and two on the other end. This will be the inside corner to make a sturdy square.


From here it's time to clamp all the boards together to complete the skeleton of the project. I had to use my Rockler wood clamps again to keep the boards in line while I placed the screws into the boards.

And that's two inside brackets completed. The shelves really went together easy and are quite sturdy since I decided to make the inside corner connect with my pocket hole jig.

In part 2, I'll need to decide on the outer shell. How to connect the front board to the top and bottom pieces of wood that will complete the shelf.
So I researched the project for some ideas. Surprisingly, I only found a couple of websites that had corner floating shelves. In reality, it was two DIY blogs and both used 2x4's for the inside structure. So, I centered my original plans around 2x4's on paper.

In this crude drawing of plans, the only part that was set in stone was the outer dimensions. The 46" by 28" shelf length was here it stay. Everything else was a guess and up for debate once I started the project. After looking through my available pile of project wood and the logistics of it, I decided that the 2x4's was not going to happen. It seams a bit overkill, plus I felt I could do better than the two web plans I stumbled across.
Instead I opted for 1x3 pine for the skeleton of the project. I had most of it on hand and it made the shelves a bit more precision on my part. As I started cutting the wood and laying it out on my shop floor, I was happy with the decision to abandon the 2x4's.

I have the Kreg Pocket Hole jig that I love using for as many of my projects as I can. This project was another perfect use for it since all of the pocket holes will be concealed by the outer shell. Now I don't have the fancy, quick release Kreg jig. Instead, I've always used one of my Rockler wood clamps to get the job done.

I'm making two shelves total, with seven 7" boards per shelf. Six of the boards will have two holes each and the seventh board will have two on one end and two on the other end. This will be the inside corner to make a sturdy square.


From here it's time to clamp all the boards together to complete the skeleton of the project. I had to use my Rockler wood clamps again to keep the boards in line while I placed the screws into the boards.

And that's two inside brackets completed. The shelves really went together easy and are quite sturdy since I decided to make the inside corner connect with my pocket hole jig.

In part 2, I'll need to decide on the outer shell. How to connect the front board to the top and bottom pieces of wood that will complete the shelf.
