
Now that I have finally hung the HDTV, Phase One is completed and Phase Two begins. What was on the to do list for Phase One, hang the TV in a recessed wall box, but there was a lot of steps to get to that point. Phase Two is a little simpler, but there is more to do that are cosmetics and finishing touches. First is to add a sub-floor, then crown molding, door and window trim, and finally carpet and baseboard trim. Once all of those smaller projects are completed, Phase Three of building items for the room will finish up the project.
We still have some of the original carpet laid on top of bare cement from when we first moved into our home. It's that ugly flat, cheep grey carpet that was installed by the previous owners and possibly the original owners of the home. The worst part of this carpet is the cold cement floor in the winter months. If you live in the north and have walked on a cement floor in February, you know exactly how cold it can feel.
Adding the sub-floor is just about as exciting as hanging my HDTV. It will warm the room up and no more walking on a cement floor! DRICore makes a wonderful sub-floor product that we are using in our Family Room Project. These are 2' x 2' tongue and groove panels, that install very easy. As you can see in the photo below, the bottom has a rigid plastic that keeps the wood panel off the cement and gives a moisture barrier. You only lose 7/8" of in inch in height.

For the room we have we needed 77 panels to complete the project. When I made a run to Menards, our local hardware store, they only had 32 of the panels in stock at the time, so I purchased all they had. They recommend you bring them into your home for 24 hours before you work with them so they can acclimate to the conditions in your home. Since I only had 32 panels, I could only complete a little less than half of the room.

If you look closely in the stack of panel photos, you can see the drywall installed by the previous owners is sitting directly on the ground. DRICore recommends the drywall sits 1/2 in above the panels. So I came up with this elaborate system to cut the bottom of the drywall without banging into the cement wall behind it.

I worked rather well, it just left a mess behind it. That's no surprise since drywall can leave quite the mess when your working with it.


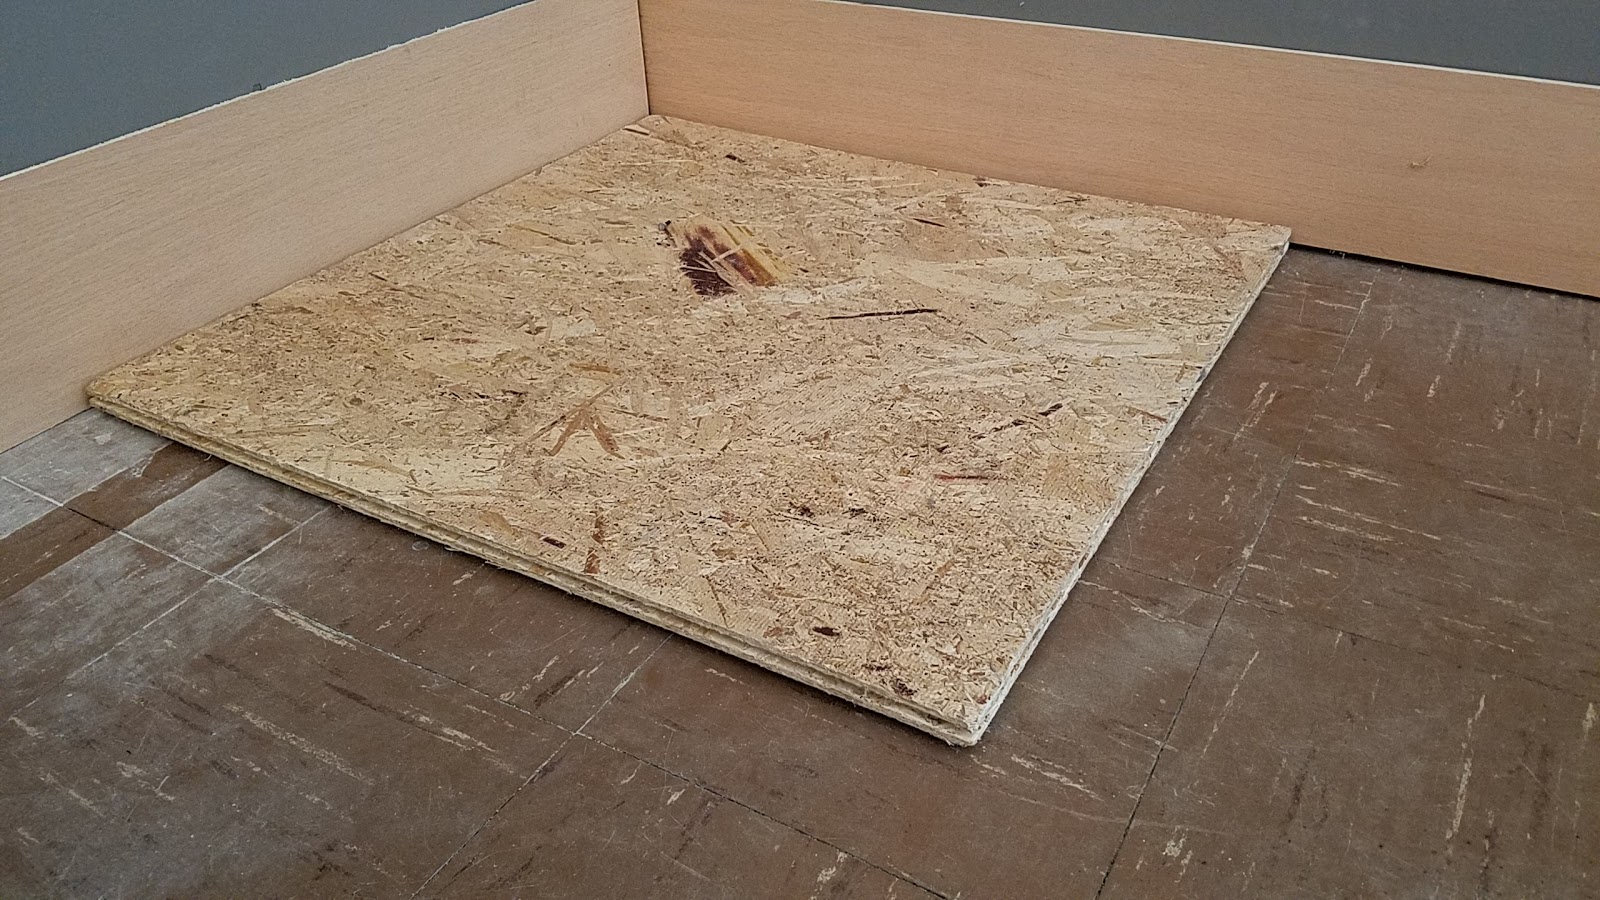
The first piece goes down, tongue side into the corner with a 1/4 inch spacer from the wall. This allows the floor to breath over the changing of the seasons. It's a floating floor, however since we are adding carpet, I will add anchor screws to hold the perimeter in place while the carpet stretches.

Starting the second row, you stagger the panels to add strength as you never want to have four corners touching each other. I have not connected the boards in the photo so you can easily see the outline of each panel.


There is one area, near the door to exit my basement, that we need to add ceramic tile instead of the sub-panels. This is because we are adding a steel entry door and cannot cut off the bottom, nor raise the door up to accommodate the lost 7/8". We did have to use the floor leveling panels to adjust for the depth of the removed ceramic tile. We are not covering the exact area used by the old tile, just a smaller portion.

There are 33 panels in place or almost half of the room and I am out of panels at this point.

It's a new day, and I paid a visit to another Menards to purchase more of the DRICore panels.

Up until this point, my rows have been full panels with a half panel on the ends. My fireplace presents a couple of angles and not quite square corners.

Working on the last two rows and doing the most cutting to fit the last of panels into place. Not surprising, the last two rows took the longest to install.

But once the last piece went down, the room felt warmer.

This is the view standing in my hallway. The hallway will need the panels installed, as well as the other rooms down here. The hallway will be done soon, while the other rooms will come in time.

We still have some of the original carpet laid on top of bare cement from when we first moved into our home. It's that ugly flat, cheep grey carpet that was installed by the previous owners and possibly the original owners of the home. The worst part of this carpet is the cold cement floor in the winter months. If you live in the north and have walked on a cement floor in February, you know exactly how cold it can feel.
Adding the sub-floor is just about as exciting as hanging my HDTV. It will warm the room up and no more walking on a cement floor! DRICore makes a wonderful sub-floor product that we are using in our Family Room Project. These are 2' x 2' tongue and groove panels, that install very easy. As you can see in the photo below, the bottom has a rigid plastic that keeps the wood panel off the cement and gives a moisture barrier. You only lose 7/8" of in inch in height.

For the room we have we needed 77 panels to complete the project. When I made a run to Menards, our local hardware store, they only had 32 of the panels in stock at the time, so I purchased all they had. They recommend you bring them into your home for 24 hours before you work with them so they can acclimate to the conditions in your home. Since I only had 32 panels, I could only complete a little less than half of the room.

If you look closely in the stack of panel photos, you can see the drywall installed by the previous owners is sitting directly on the ground. DRICore recommends the drywall sits 1/2 in above the panels. So I came up with this elaborate system to cut the bottom of the drywall without banging into the cement wall behind it.

I worked rather well, it just left a mess behind it. That's no surprise since drywall can leave quite the mess when your working with it.

It cleaned up well and I was just off by a tad matching up to the bottom of the wall that I built. But you can clearly see the cement wall.

The first piece goes down, tongue side into the corner with a 1/4 inch spacer from the wall. This allows the floor to breath over the changing of the seasons. It's a floating floor, however since we are adding carpet, I will add anchor screws to hold the perimeter in place while the carpet stretches.
Starting the second row, you stagger the panels to add strength as you never want to have four corners touching each other. I have not connected the boards in the photo so you can easily see the outline of each panel.

There really isn't much you need for tools to install the product. A hammer, a board to smack the panels into their groove, tape measure, a crowbar or some type of pry-bar, and a saw to cut the panels.

There is one area, near the door to exit my basement, that we need to add ceramic tile instead of the sub-panels. This is because we are adding a steel entry door and cannot cut off the bottom, nor raise the door up to accommodate the lost 7/8". We did have to use the floor leveling panels to adjust for the depth of the removed ceramic tile. We are not covering the exact area used by the old tile, just a smaller portion.

There are 33 panels in place or almost half of the room and I am out of panels at this point.

It's a new day, and I paid a visit to another Menards to purchase more of the DRICore panels.

Up until this point, my rows have been full panels with a half panel on the ends. My fireplace presents a couple of angles and not quite square corners.

Working on the last two rows and doing the most cutting to fit the last of panels into place. Not surprising, the last two rows took the longest to install.

But once the last piece went down, the room felt warmer.

This is the view standing in my hallway. The hallway will need the panels installed, as well as the other rooms down here. The hallway will be done soon, while the other rooms will come in time.


0 comments:
Post a Comment