
Now that I have finally hung the HDTV, Phase One is completed and Phase Two begins. What was on the to do list for Phase One, hang the TV in a recessed wall box, but there was a lot of steps to get to that point. Phase Two is a little simpler, but there is more to do that are cosmetics and finishing touches. First is to add a sub-floor, then crown molding, door and window trim, and finally carpet and baseboard trim. Once all of those smaller projects are completed, Phase Three of building items for the room will finish up the project.
We still have some of the original carpet laid on top of bare cement from when we first moved into our home. It's that ugly flat, cheep grey carpet that was installed by the previous owners and possibly the original owners of the home. The worst part of this carpet is the cold cement floor in the winter months. If you live in the north and have walked on a cement floor in February, you know exactly how cold it can feel.
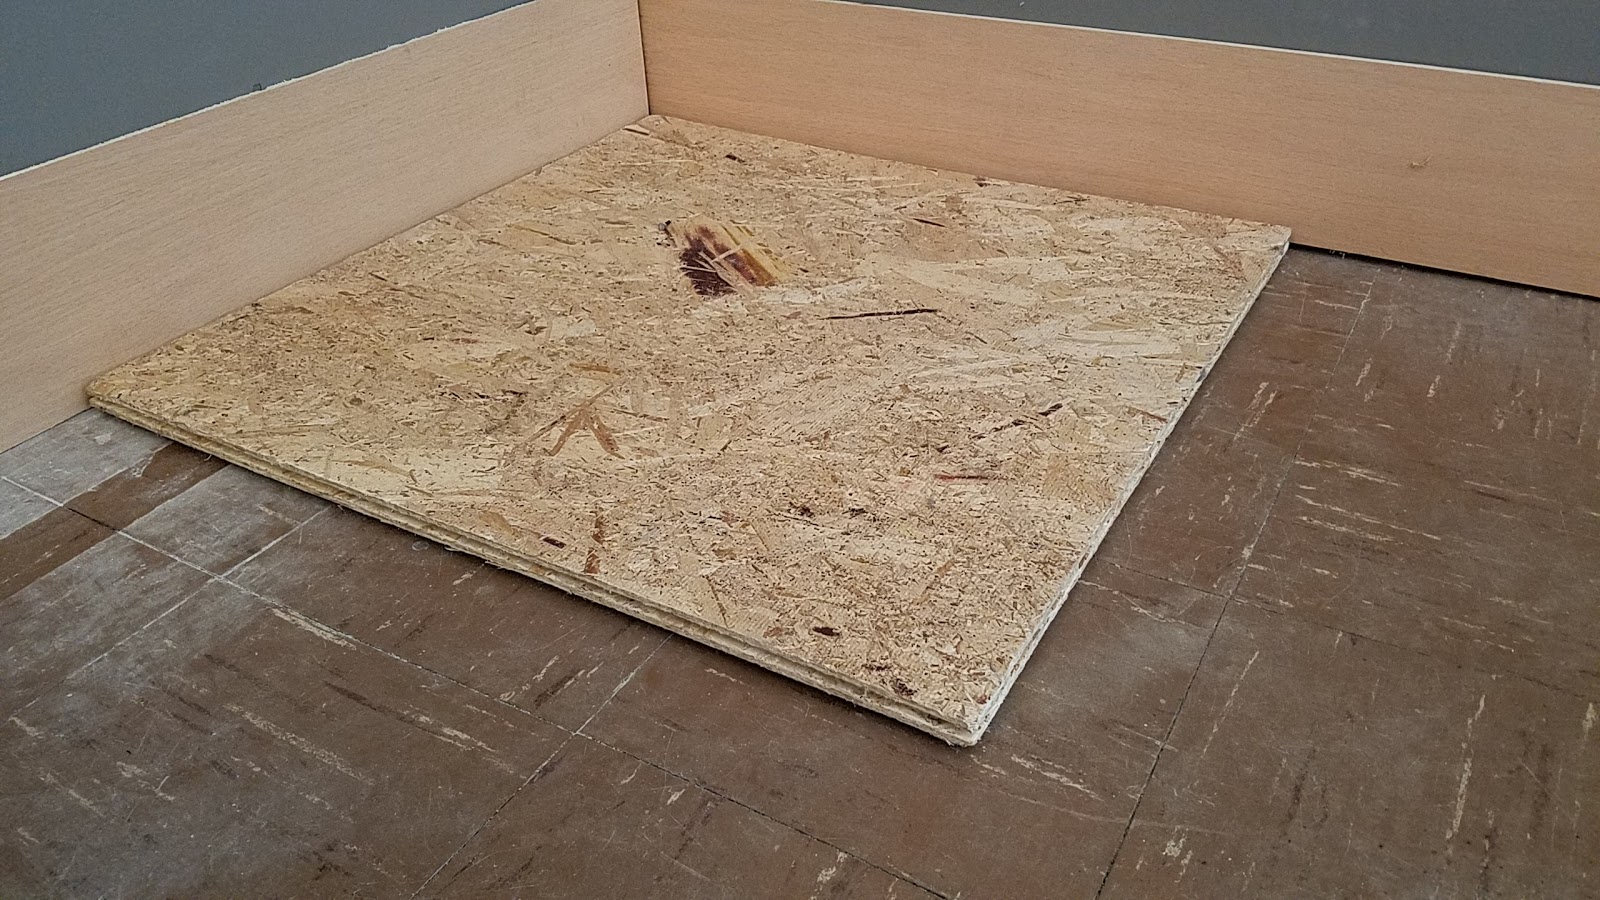
Adding the sub-floor is just about as exciting as hanging my HDTV. It will warm the room up and no more walking on a cement floor! DRICore makes a wonderful sub-floor product that we are using in our Family Room Project. These are 2' x 2' tongue and groove panels, that install very easy. As you can see in the photo below, the bottom has a rigid plastic that keeps the wood panel off the cement and gives a moisture barrier. You only lose 7/8" of in inch in height.

For the room we have we needed 77 panels to complete the project. When I made a run to Menards, our local hardware store, they only had 32 of the panels in stock at the time, so I purchased all they had. They recommend you bring them into your home for 24 hours before you work with them so they can acclimate to the conditions in your home. Since I only had 32 panels, I could only complete a little less than half of the room.

If you look closely in the stack of panel photos, you can see the drywall installed by the previous owners is sitting directly on the ground. DRICore recommends the drywall sits 1/2 in above the panels. So I came up with this elaborate system to cut the bottom of the drywall without banging into the cement wall behind it.

I worked rather well, it just left a mess behind it. That's no surprise since drywall can leave quite the mess when your working with it.


The first piece goes down, tongue side into the corner with a 1/4 inch spacer from the wall. This allows the floor to breath over the changing of the seasons. It's a floating floor, however since we are adding carpet, I will add anchor screws to hold the perimeter in place while the carpet stretches.

Starting the second row, you stagger the panels to add strength as you never want to have four corners touching each other. I have not connected the boards in the photo so you can easily see the outline of each panel.


There is one area, near the door to exit my basement, that we need to add ceramic tile instead of the sub-panels. This is because we are adding a steel entry door and cannot cut off the bottom, nor raise the door up to accommodate the lost 7/8". We did have to use the floor leveling panels to adjust for the depth of the removed ceramic tile. We are not covering the exact area used by the old tile, just a smaller portion.

There are 33 panels in place or almost half of the room and I am out of panels at this point.

It's a new day, and I paid a visit to another Menards to purchase more of the DRICore panels.

Up until this point, my rows have been full panels with a half panel on the ends. My fireplace presents a couple of angles and not quite square corners.

Working on the last two rows and doing the most cutting to fit the last of panels into place. Not surprising, the last two rows took the longest to install.

But once the last piece went down, the room felt warmer.

This is the view standing in my hallway. The hallway will need the panels installed, as well as the other rooms down here. The hallway will be done soon, while the other rooms will come in time.

We still have some of the original carpet laid on top of bare cement from when we first moved into our home. It's that ugly flat, cheep grey carpet that was installed by the previous owners and possibly the original owners of the home. The worst part of this carpet is the cold cement floor in the winter months. If you live in the north and have walked on a cement floor in February, you know exactly how cold it can feel.
Adding the sub-floor is just about as exciting as hanging my HDTV. It will warm the room up and no more walking on a cement floor! DRICore makes a wonderful sub-floor product that we are using in our Family Room Project. These are 2' x 2' tongue and groove panels, that install very easy. As you can see in the photo below, the bottom has a rigid plastic that keeps the wood panel off the cement and gives a moisture barrier. You only lose 7/8" of in inch in height.

For the room we have we needed 77 panels to complete the project. When I made a run to Menards, our local hardware store, they only had 32 of the panels in stock at the time, so I purchased all they had. They recommend you bring them into your home for 24 hours before you work with them so they can acclimate to the conditions in your home. Since I only had 32 panels, I could only complete a little less than half of the room.

If you look closely in the stack of panel photos, you can see the drywall installed by the previous owners is sitting directly on the ground. DRICore recommends the drywall sits 1/2 in above the panels. So I came up with this elaborate system to cut the bottom of the drywall without banging into the cement wall behind it.

I worked rather well, it just left a mess behind it. That's no surprise since drywall can leave quite the mess when your working with it.

It cleaned up well and I was just off by a tad matching up to the bottom of the wall that I built. But you can clearly see the cement wall.

The first piece goes down, tongue side into the corner with a 1/4 inch spacer from the wall. This allows the floor to breath over the changing of the seasons. It's a floating floor, however since we are adding carpet, I will add anchor screws to hold the perimeter in place while the carpet stretches.
Starting the second row, you stagger the panels to add strength as you never want to have four corners touching each other. I have not connected the boards in the photo so you can easily see the outline of each panel.

There really isn't much you need for tools to install the product. A hammer, a board to smack the panels into their groove, tape measure, a crowbar or some type of pry-bar, and a saw to cut the panels.

There is one area, near the door to exit my basement, that we need to add ceramic tile instead of the sub-panels. This is because we are adding a steel entry door and cannot cut off the bottom, nor raise the door up to accommodate the lost 7/8". We did have to use the floor leveling panels to adjust for the depth of the removed ceramic tile. We are not covering the exact area used by the old tile, just a smaller portion.

There are 33 panels in place or almost half of the room and I am out of panels at this point.

It's a new day, and I paid a visit to another Menards to purchase more of the DRICore panels.

Up until this point, my rows have been full panels with a half panel on the ends. My fireplace presents a couple of angles and not quite square corners.

Working on the last two rows and doing the most cutting to fit the last of panels into place. Not surprising, the last two rows took the longest to install.

But once the last piece went down, the room felt warmer.

This is the view standing in my hallway. The hallway will need the panels installed, as well as the other rooms down here. The hallway will be done soon, while the other rooms will come in time.

The best laid plans of mice and men often go awry....
Painted black, blue taped, in this simplistic layout, there lies a flaw. One large, obnoxious flaw. It's all there, black and white, right there for you to see. No wait, I have not revealed this yet, so not so obvious for you.
I purchased from Amazon, a very simple and inexpensive flat HDTV stand from Cheetah for about $24 dollars. It mounts flat to the wall, connect it to the recessed box, hang the TV and done. However, that works great for a wall that is flat, not recessed. You see, with a 65" HDTV to be mounted, that leaves one inch of space to get your hands around the back to connect all of the wires or do ANYTHING in the back of the TV. That's a big problem!
So, my inexpensive stand went to the wayside and will be used elsewhere. I had to research a new articulating HDTV wall mounting bracket. I deceided on the ECHOGEAR EGLF1-PK for about $80 bucks (as of this posting). If you are in need of a heavy duty stand, this one is just what you need for a reasonable price. My 65" Samsung weighs 72 pounds and the stand is rated for 132 pounds.

The new mounting bracket was a bit larger than the first bracket, and that created yet another problem. Where I needed to mount the bracket to the wall, it now partly covered the 3-Gang Box. I needed to lower the box to accommodate the larger base of the new stand. My first thought was to remove the entire wooded recessed box and replace the back panel.


I used my Kreg Jig to build the wooded recess box, so naturally I used this to reattached the removed piece of wood. I don't own a biscuit joiner, but that would have also got the job done.


First coat of gray is on the walls. This four foot doorway leads to the upstairs.

Panning out on the TV side of the room, in this photo, I have not moved the 3-Gang box. But that is all spelled out above.

A closer look at the Echogear wall mounting bracket and how everything fits behind the TV now. Nevermind all of that ceiling debris, it's all cleaned up now.

And finally, the front of the TV, mounted in the recessed box with an inch of space to spare.

Painted black, blue taped, in this simplistic layout, there lies a flaw. One large, obnoxious flaw. It's all there, black and white, right there for you to see. No wait, I have not revealed this yet, so not so obvious for you.
I purchased from Amazon, a very simple and inexpensive flat HDTV stand from Cheetah for about $24 dollars. It mounts flat to the wall, connect it to the recessed box, hang the TV and done. However, that works great for a wall that is flat, not recessed. You see, with a 65" HDTV to be mounted, that leaves one inch of space to get your hands around the back to connect all of the wires or do ANYTHING in the back of the TV. That's a big problem!
So, my inexpensive stand went to the wayside and will be used elsewhere. I had to research a new articulating HDTV wall mounting bracket. I deceided on the ECHOGEAR EGLF1-PK for about $80 bucks (as of this posting). If you are in need of a heavy duty stand, this one is just what you need for a reasonable price. My 65" Samsung weighs 72 pounds and the stand is rated for 132 pounds.

The new mounting bracket was a bit larger than the first bracket, and that created yet another problem. Where I needed to mount the bracket to the wall, it now partly covered the 3-Gang Box. I needed to lower the box to accommodate the larger base of the new stand. My first thought was to remove the entire wooded recessed box and replace the back panel.

That was a ton of work and not a simple solution, even though it would be a cleaner look when finished. Instead, I decided to cut a chunk of wood out and move that piece up. This would give the exact same shape for the 3-Gang box. Yes, that is flat black paint and it marks up way too easy. In the future, I would use some type of matte finish if you paint your box.

I used my Kreg Jig to build the wooded recess box, so naturally I used this to reattached the removed piece of wood. I don't own a biscuit joiner, but that would have also got the job done.

I had to come up with some way to hold the filler piece in place while I screwed it in place. So this odd design, using brackets and scrap wood was an odd sight to see. However, there was just enough room to get the drill in place to tighten all of the screws.

Kreg also sells the wooded plugs to cover the holes. This was my first time using them and they worked wonderful. A little bit of wood filler, some sanding....

One final coat of my ugly black flat paint and it looks as good as new. If you enlarge the photo, I'm sure you can make out the trace of where the original location was, but once the TV is in place, I have no idea what mistake I made.

While I was monkeying around with moving the 3-Gang Box, I was painting the room to the gray color wifey and I had selected. Aside from the frame around the HDTV, we will paint all of the trim work white. Here is the last of the before photos, green walls, furniture in the middle of the room.

First coat of gray is on the walls. This four foot doorway leads to the upstairs.

Panning out on the TV side of the room, in this photo, I have not moved the 3-Gang box. But that is all spelled out above.

A closer look at the Echogear wall mounting bracket and how everything fits behind the TV now. Nevermind all of that ceiling debris, it's all cleaned up now.

And finally, the front of the TV, mounted in the recessed box with an inch of space to spare.

It has been a while since I've posted an update to the Family Room Remodel project. I have everything done inside the wall that I can do. We just had the cable company out to install the final line that I needed for the lower custom Wall Plate that I had built from RiteAV. In my lower wall plate I have three HDMI ports, one coax port, and two network ports. I also have a pass through port, incase I needed something later and finally I have another speaker wire wall plate for the surround sound. Lots of wires!


The backside of the RiteAV Wall Plate is packed so nice and tight, but it is a very simple product, easy to use and you can customize your ports to your liking. There are no wire splicing whatsoever, you just connect the cables right to the correct ports.

When everything is connected, in place and completed, we are left with this wonderful looking setup. Doesn't this have a nice, clean professional look to it?


This is my original TV stand bracket that I purchased. I have another blog post coming about why I had to purchase a second one. This one was cheep, about 20 bucks.

In the upper Wall Plate box, I'm using a three gang that will house electrical, another pass through and one more custom RiteAV plate, but only four ports for this one, three HDMI and one network port.

With everything in place, it all has the familiar professional looking feel to it. I'm very happy with how it turned out.

This became a favorite resting spot for my cat Lily before the TV was installed.

The second recessed box I need to build has dimensions of 2'6" x 3' with a 10" depth. This box will have a couple of shelves and will hold decorative items.

Both boxes are installed and I have the holes drilled for the shelves. I made them adjustable as I'm unsure what we will put on these shelves currently.

It's coming along great and we are getting close to finishing phase one of this project. Next up is painting, and moving the top wall plate.


I have installed the Drywall finally, cut my opening for the lower wall plate and I've added a four gang recessed box for my wall plates. I'm pretty sure I found that via Amazon.

I put labels on all of the cables that were similar, mainly the speaker wires. It certainly does look like a mess coming from there and my wife wasn't quite sure what to think of all of the wires, but I asured here we needed them all for this project and they all had a purpose.

The backside of the RiteAV Wall Plate is packed so nice and tight, but it is a very simple product, easy to use and you can customize your ports to your liking. There are no wire splicing whatsoever, you just connect the cables right to the correct ports.

When everything is connected, in place and completed, we are left with this wonderful looking setup. Doesn't this have a nice, clean professional look to it?

In the meantime, I was building the recessed box that will house the HDTV, which I neglected to take any photos of until it was finished. I used my Kreg jig for this project. The box dimensions are right around 5' x 3' with a depth of six inches. It will hold a 65" HDTV with about an inch border around to spare.

This is my original TV stand bracket that I purchased. I have another blog post coming about why I had to purchase a second one. This one was cheep, about 20 bucks.

In the upper Wall Plate box, I'm using a three gang that will house electrical, another pass through and one more custom RiteAV plate, but only four ports for this one, three HDMI and one network port.

With everything in place, it all has the familiar professional looking feel to it. I'm very happy with how it turned out.

This became a favorite resting spot for my cat Lily before the TV was installed.

The second recessed box I need to build has dimensions of 2'6" x 3' with a 10" depth. This box will have a couple of shelves and will hold decorative items.

Both boxes are installed and I have the holes drilled for the shelves. I made them adjustable as I'm unsure what we will put on these shelves currently.

It's coming along great and we are getting close to finishing phase one of this project. Next up is painting, and moving the top wall plate.

So with the Garage Painting Project completed, we had some trim work around the house windows that needed a quick paint job. Wifey noticed one of the windows, ummm, didn't want any paint on it. Essentially, it was in rough shape the last time we painted it. This time around, it started to crumble. My first thought was to replace the entire window, as that is what we'd like to do with all of the house windows, just not right now. After some thought, I decided I would tackle replacing the rotted window sill myself.

As you can see, there's just not much left of it on the outside of the house. Most of the remaining frame is still in great condition. The bottom of the two side pieces where the decaying wood is really the only other questionable portion. Time to find my Sawzall and cut out the rotted sill.

There it is, my Milwaukee Sawzall, ready to cut out the bad board. First I made two cuts, but left one to two inches of wood. There were no nails in the main part of the sill, but I did have staples holding the window frame together.

Next I used a 1 inch chisels and started breaking out the remainder of the sill piece by piece. The staples were about an inch long, so I had a tough time breaking these free. Eventually they came out and the old board was completely gone.

I purchased a 2" x 6" AC2 Green Treated board from Menards for $3.39 and I was ready to recreate the new sill plate.

So after taking my window frame measurements, I needed to figure out how to cut an angle on the front of the sill as the board will sit at a bit of an angle once it is installed. So I used the back side of the original sill, as it also had an angled cut.

The remaining piece was so small, there just wasn't enough to get a true angle. I couldn't quite match it up on my test cuts, so decided to just take a guess and be happy with it.

So the width of the window was 36 inches, however the inside frame was 34.5 inches. Or something close to that. With the front and rear of the new sill angled, I made the cuts on the side of the board.

The YouTube video I found, it said to spray paint the sill with a water resistant primer, which I was eager to do. After spraying the new board, I then recalled I needed to make more cuts to the front and sides of the new sill.

I had to break out the Shop Smith at this point to make these next cuts. I needed to match up the angle of the new sill in order to keep the cuts correct.

I just used a single blade and made several runs through, then chiseled and sanded for the final finish.

Made the cuts on the sides, cleaned it up and spray painted the board once again, so it hopefully slides right in place. Well, you know it will be a bit of a fight.

And this is the final look of the board. I did have a bit of a struggle with the board. First, I had removed a 1 1/4 inch board and replaced it with a 1.5 inch board. I knew I would have to cut some of the frame out, however since some of this wood that contacted the old sill plate was rotting, it wasn't a big deal to raise the plate by a quarter inch.

I did have to do a bit more sanding to get the board in place, but eventually I was able to get the replacement sill in place. The one item I overlooked was the aluminum storm and screen frame was now a but to large for the smaller opening. I fixed this by cutting off a small portion of the frame. I had a full functioning window at this point.

Lastly, I used some wood filler in the quarter inch gap on the left side of the sill to fill in the last of the rotted wood. I was debating between replacing the entire strip of wood or just the last few inches of the wood, but my father suggested to try the wood filler. In the end it was a quicker fix and is covered up quite well with the last coat of paint.

Here is the finished project. I will have to replace the glazing another time as the weather is starting to turn for the season and there are a couple of pressing projects that need attention yet before the snow flies.

Oh yeah, let's put the storm window back on to complete this project.

Before and After

